Jim Kearns
01

Find Salvageable Material
I often find the lumber from Craiglist ads where individuals are giving their scraps away before they decide to send the pieces to the landfill. These pieces are often from old decks, fences and other construction projects. The old lumber often found is pine, redwood, cedar and treated pieces. I do occasionally get contacted by woodworkers with scrap hardwoods leftover from finished projects.
02
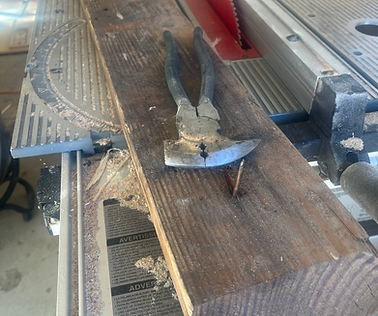
Restore Lumber for Use
This process includes pulling nails and screws, ripping boards on the table saw to remove uneven or damaged edges, and planing the tops of boards. Some board I will leave the old weathered tops as it can add certain elements to the art, such as creating a darker line between the wood tiles.

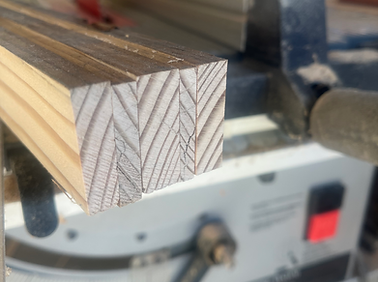
03
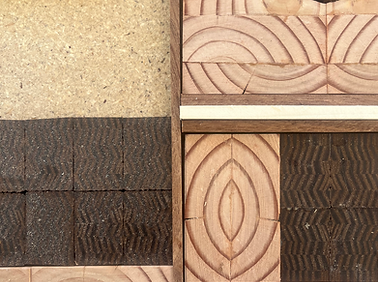
Looking at the Grains
After the boards are cleaned up and squared it is time to start looking at the grains of the board and picturing what sort of patterns could be created with individual boards. Boards with a uniform grain through the length of the board has the ability to make a more consistent pattern. Pieces with tight grains vs. spread out grains will all make a different look. Boards with lots of knots create unique opportunities for unknown creations to only show themselves once cut, this is where the entities like to reveal themselves and is always exciting when that happens. Boards with the the pith and surrounding rings gives opportunities to make eyes by book matching the cuts. Lumber where the sapwood meets the heartwood often has a change of color and can make a good opportunity for contrast in the patterns. All these options play a role in deciding which boards to use and spring up ideas on how the composition of the pieces will be laid out.
04
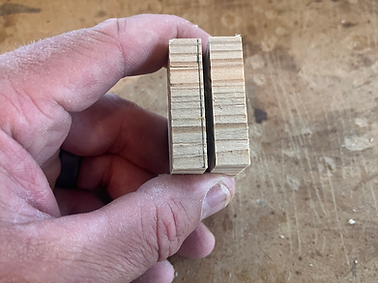
Ripping and Flipping
For boards that have the uniform grain, either tight grains or wide, I start by ripping the slats at various widths. Wider or narrow slats will create a different pattern. Also the number of slats used can determine the intervals at which the pattern repeats itself. Two slats will repeat itself often, while a five slat pattern will have more sections to repeat. Some boards are used just as is without cutting slats. Once the slats are cut, they are flipped lengthwise, every other slat, and then the board is re-glued together.
05
Cutting Tiles
After the cut slat board is glued back together, tiles are individually cut but careful to be kept in the correct order and orientation to allow the grains to match once the book matching and flipping takes place. Tiles are generally cut at 1/4" to 3/8" thick.
06
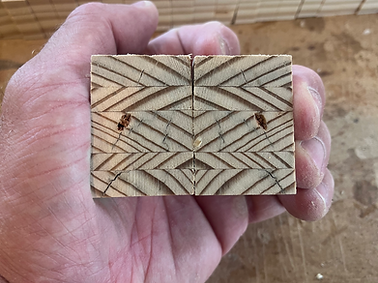
Book Matching and Flippin
Next, taking the tiles that are placed in the correct order and orientation, flipping to book match as well flipping to match grains in other directions takes place. Different patterns can be achieved by flipping from different sides of the tiles. Matching horizontal will achieve a different pattern than matching the vertical sides.

07
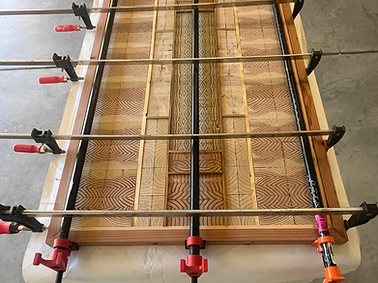
Layout and Begin Clamping
Once various patterns are cut and the tiles have been laid out to show their patterns the composition of the different sections of the piece can start to form. Different layouts are experimented, realigned, and studied. Once a layout intuitively feels right and hopefully sparks an inner feeling of joy, the composition is decided upon. At this point it becomes more clear which pieces would benefit by being clamped together to reduce gaps in the adjoining pieces as well as creating larger sections that allow for ease of cutting to square off edges to make for tight fits later on.
08
Boarder Pieces
To separate the different patterns and sections of the piece, boarder pieces are used to compartmentalize the areas. Choosing the correct color of wood and thickness to use for the boarders can add to the feel of the piece.

09
Gluing to Backerboard
Once all the tiles are cut, various pieces are squared off to fit within their sections, boarder boards are cut to correct length and width it is time to starts gluing to the backer boards. Backer boards are generally purchased fiberboard or other stock that was salvaged that has maintained its structural integrity and shape. The boards are measured and marked to ensure the pieces are glued on in their correct locations, generally beginning in the middle and working out toward the edges. Clamps are often used to ensure edges abut as tight as possible. Once the pieces are glued on and adhere, the piece is carefully ran through the table saw to clean up the edges.
10
Framing
After the piece has had its edges squared and cut, its time to add the framed out boards that create the edges. This is usually comprised of two to three boards of different colors to create a window look as well as leaving a nice clean and crisp outer edge. Unique looking boards are often chosen for the outer edge, some with oxidation, some with intriguing colors and knots. These framed slats are glued and clamped to the entire thickness of the backing board and the tiles to ensure a sturdy construction piece of art.

11
Sanding and Finishing
The magic always seems to happen in this step. The hardest work has been completed and now its time for the art to shine. Using a belt sander with coarse grit (60-80) the pieces is leveled off removing any glue left over or uneven pieces. After this initial sanding any cracks in the tiles edges or inherent holes from remnants of the lumber's former life are filled with wood filler mixed with color to either match the wood or create colored effects. After the wood filler dries the piece is sanded again with the belt sander using 120 grit to remove the filler from the surface, followed by the orbital sander using 220 grit, then 320 grit. Then its time to move on to hand sanding with 400 grit and up to 800 grit. Once sanding is complete its time to apply the finish which is a mixture of linseed oil, polyurethane and mineral spirits which penetrates the wood and reveals its natural beauty. Three to four separate applications of the finish is used, using 800 grit sanding once each coat has dried and hardened. The back of the piece also receives 1-2 applications of finish, although not as meticulously sanded.
12
Hanging
Depending on the size of the piece, either wire with D-rings or a french cleat is used for hanging the piece. Extra caution is used to ensure adequate wire gauge and sturdy connection of properly sized D-rings. The piece is now ready for showing!
